Fossil Raindrop Impressions
Getting The Right Lighting
The images below show a rock in our collection that has fossilized raindrop impressions. The impressions are raised, so this is a natural cast of the the raindrop impressions.
Both photos are of the same rock taken under different lighting.
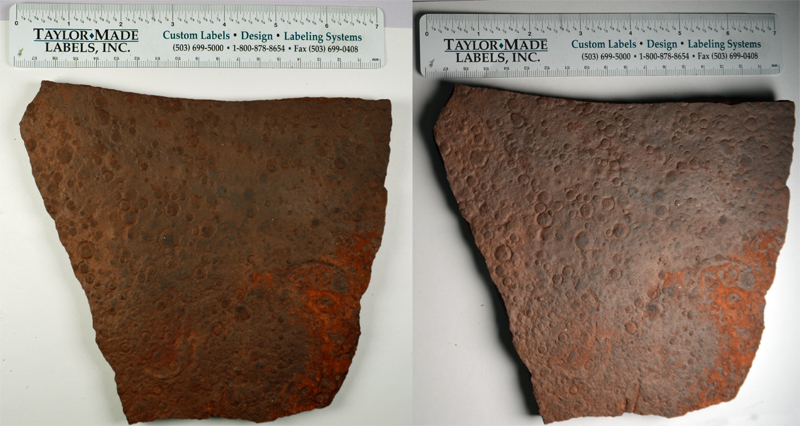
The photo on the left was taken using equal lighting from both sides at about a 45 degree angle. This is a good approach for eliminating shadows.
The photo on the right was taken with a single light on the right, set at a very low angle. The light was the same light used in the left photograph.
The most noticeable difference is that the raindrop impressions are much more visible in the photo on the right... the one with the low angle lighting. The low angle lighting produces shadows that highlight the raindrop impressions. When studying trace fossils we photograph them using a variety of lighting conditions, lighting angles, camera angles, and exposures. What is "invisible" in one photograph, will pop out in another, even revealing fossil impressions and details not seen with direct observation.
When searching for trace fossils, such as dinosaur footprints, it is best to search in the early morning, or late afternoon, when the sun is at a low angle. A dinosaur track (or raindrop impressions) that was totally "invisible" during the main part of the day, will become visible early or late in the day.
Notice in the photo below more of the raindrop impressions are visible.

The above photo was taken with the camera at a 25 degree angle to the stone and with low angle lighting from the right. However, we don't tilt the camera. Wedges are used to tilt the stone. We have a variety of wedges and shims available. The right hand photo shows some of them.
In addition, the above photograph is actually two photographs that have been merged. By using multiple photographs we are able to create a composite image that brings out the details across the entire stone. This allows identification of features in the context of the entire surface of the stone. However, in this case, we need to keep in mind that in this photo the stone is at an angle to the camera, meaning the scale of the features varies from left to right. Once we identify a feature of interest in a photo such as this, and document its location, we can usually locate it through direct observation and take measurements directly on the stone.
Overall we might take 20 to 30 photos, and use maybe 10 to 12 of them when studying a stone. In addition we'll do direct observation, including direct observations using magnification.
Fossil Mud Cracks
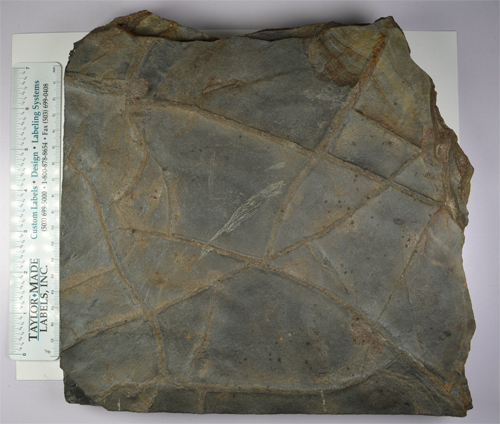
This photo (above) shows a stone, from our collection, with distinct mud cracks. Based on laboratory studies, the theory is that the number of times mud has cracked as a result of repeated exposures to moisture, can be determined based on the angle of the cracks. Newly formed cracks will be at about a 120 degree angle. The more wet-dry cycles the mud goes through, the angle becomes closer to 90 degrees. What is interesting about these fossil mud cracks is that we see both 90 degree cracks and 120 degree cracks, as well as cracks at other angles, on the same surface. This raises the question. Are there mud crack forming conditions that are being ignored in the laboratory? Such as the conditions that would likely exist as a result of a global flood? Mud cracks are not a research area that receives much attention, and we do not know of anyone who has done research that would answer this question.
The image below is from the previous page, and shows two other stones in our collection that have mud cracks.
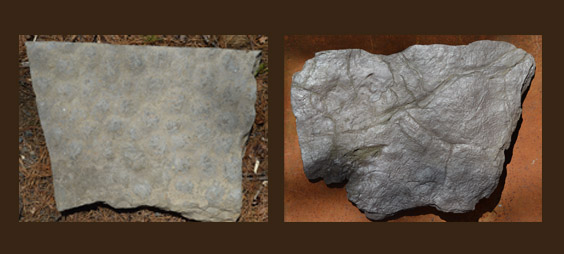
Notice the stone on the right. The mud cracks appear to be random and chaotic. There is no pattern that can be distinguished. These mud cracks most likely formed underwater. The mud was de-watered (and shrank) as a result of the weight of the overlaying layers of sediment. In the larger image above, the cracks are at distinct angles. These cracks must likely resulted from mud exposed to the air. The commonly accepted theory is that the mud was dried as the result of heat from the sun. However, other sources of heat, such as heat from hot sub-surface volcanic rock (recently buried by sediment), could also be the cause of the mud drying.
NOTE: tests and experiments done to determine mud crack formation angles have all assumed heat from the sun dried the mud. The mud would dry from the top down as the sun warmed the top layers. However, mud heated from underneath would likely dry as a single unit, or possibly from the bottom up, producing a different pattern of cracks. In a global flood, during which there was extensive volcanic activity, it would make sense that in some locations hot, volcanic rocks would be covered by sediment which then would be dried by heat from the underlying rocks, producing the crack pattern we see above.
We'll talk about fossil raindrops a little more later on in the tour.
Continue the Tour